
The Arrow tool adds arrow indicators to a chart. Arrows are typically used to indicate direction of movement within a transition. Arrows can also be used to identify distances between two points.
![]()
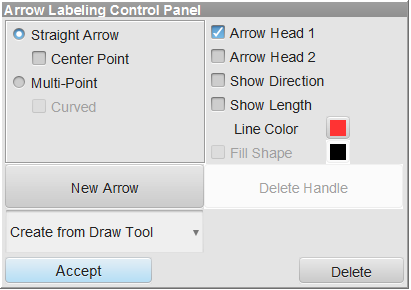
Select the Arrow Labeling tool in the Tool Palette and the Arrow Labeling Control Panel will display.
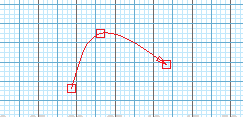
Any existing arrows will appear on the screen with editing handles at each end. Curved arrows will have an additional editing handle in the middle.
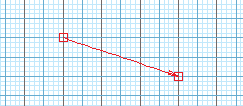
Clicking on an arrow’s editing handle will select the arrow. A selected arrow is drawn in red. Dragging an editing handle will reposition the selected arrow.
If no arrows are on the field, clicking on a location on the field will start the creation of an arrow.
If arrows already exist in the filed, click New Arrow to start the creation of a new arrow, then click the endpoints of the new arrow on the field to apply the arrow.
The type of arrow used is defined by the current settings in the Arrow Labeling Control Panel. There are two types of arrows: Straight and Multi-Point.
Arrow Types
Straight Arrow is an arrow formed by a straight line. Two clicks on the field will apply a straight arrow, with endpoints at each click.
Center Point arrow is an arrow that represents the radius of a circle or arc. The first click will be the center point and the second click will be the circumference. After the arrow is entered, the settings for the new arrow can be changed.
Multi-Point Will create a continuous arrow with each mouse click on the field. Multi-point arrows can be straight or curved, depending on your selection in the Arrow Tool Control Panel.
Arrow Styles
Arrow Heads can be added to either end of the arrow using the Arrow Head options. The length of the arrow can be placed on the arrow using the Show Length option.
Show Direction adds an arrow head at each editing handle on the arrow, pointing in the direction of movement of the arrow.
Show Length displays the length of the arrow.
Line Color brings up a color picker so you can colorize the arrow to your liking.
Fill Shape will fill the shape the arrow outlines with whatever color you pick from the color picker.
Creating Arrows with Drawing Tools
If you need to show a specific direction of movement or highlight a certain part of the performance area, it may be easier to create the arrow/filled shape with one of the Drawing tools.
To do so, select the appropriate drawing tool from the Create from Draw Tool menu in the Arrow Tool Control Panel. This will open the selected tool’s control panel. Draw the shape as you typically would, depending on your selected tool. Once you press accept in the Draw tool, you’ll be taken back immediately to the Arrow tool, where you can make any revisions necessary.
![]()
Delete Handle will remove the last editing handle added to your selected arrow.
Delete Arrow button will delete the currently selected arrow. The currently selected arrow is the arrow drawn in red. To select a different handle, click on one of its editing handles.
Accept will commit the arrow to the drill. Clicking on any tool without clicking Accept will cancel the change. The changes can also be cancelled by moving an anchor on the Count Track.
Post your comment on this topic.