
The Glue Regrouping tool is used for combining two or more shapes into single shapes. For example, imagine three lines floating into a curve. To make the editing easier, we would first want to glue the three lines into a single shape using a Glue tool. After gluing, we can select all three lines at one time as a single shape. We would then simply morph the selection into a curve.

To select the Glue tool, click on the Glue tool and the Glue Tool Control Panel will display.
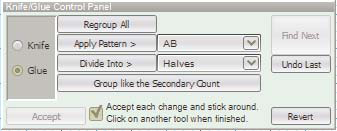
The Glue Tool Control Panel behaves differently from other tool panels. By default, there is no active Accept button. Every glue with the glue tool is accepted without having to click the Accept button. This is usually preferred because the Glue tool is used quite frequently for single glues. Requiring the click of the Accept button would simply add an unnecessary step. However, if you want to make the Glue Tool Control Panel behave like typical 3D Control Panels, click off the Accept each change and stick around… option. When this option is off, the Accept button will be available and if not clicked when you are finished gluing, then no changes will occur.
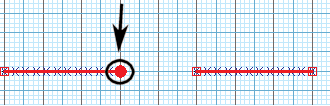
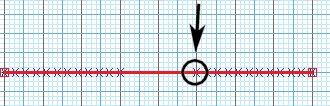
To perform a glue between two highlighted shapes, click on the performers on each end of the two shapes.
The Glue tool can be switched to the Knife tool by clicking on the Knife option.
Regroup All button will break all of the performers in the highlighted shape(s) into individual points. After the performers are broken up, you can reconnect the performers in a different order. Normally this is not used when all of the shapes of a page are highlighted. To highlight a smaller group of performers, select the group prior to clicking on the Glue tool. The Regroup All option is commonly used to change the grouping order of block shapes as shown.
You can click and drag (much like mimicking a “Gluestick”) through performers, and the grouping will be assigned based on the order you drag over a performer. Regroup performers by clicking on one endpoint (performer) of the form, then dragging through every other performer, in the order you wish them to be grouped in.
This method can also be used to regroup multiple forms. Once the last performer of a form is grouped, click on that performer. This releases the grouping option, at which point you can click on the starting performer for the new form, and repeat the process.
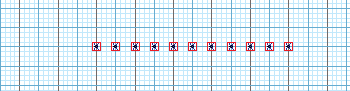
Apply Pattern is available when only one shape is highlighted. To highlight a single shape, use the Pointer Selection tool to select the shape prior to clicking on the Glue tool. To use Apply Pattern, select a pattern from the pop up menu, and click Apply Pattern. The “AB” pattern will regroup a shape where every other performer becomes a member of the first new shape and the remaining performers become members of a second new shape. It is difficult to see any change on the field display. The first new shape is almost directly over the second new shape.
Divide Into allows you to divide the selected shape into Halves, Thirds, Quarters, Pairs, Groups of 4, 6, or 8. Select the appropriate grouping you wish to apply from the drop down menu, then select Divide Into. If the Accept each change and stick around… checkbox is not checked, the new grouping will not take effect until you select the Accept button.
The Find Next button will find the next person in the direction the form has begun to be glued and then glue it to the end of the section. This function allows you to continue gluing a continuous line or form without requiring every position to be clicked on individually.
The Undo Last button will undo the last glue that was performed.
Revert button reverts the grouping order to its initial order.
Post your comment on this topic.