
The Line tool is used to create a line of performers between two points.
For NEW performers, set the Red and Yellow Anchors on the Count Track to the count at which you wish the line to be drawn. To transition EXISTING performers into a line, move the Red Anchor to the count where the selected performers should “hit” the line shape. Move the Yellow Anchor to the beginning count of the transition into the new line. This is usually the previous set in the drill. Select the existing performers that will be moving into the line using a Selection Tool. See the Drawing Tools overview for more explanation between new performers and transitioning existing performers.

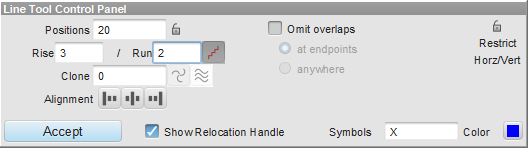
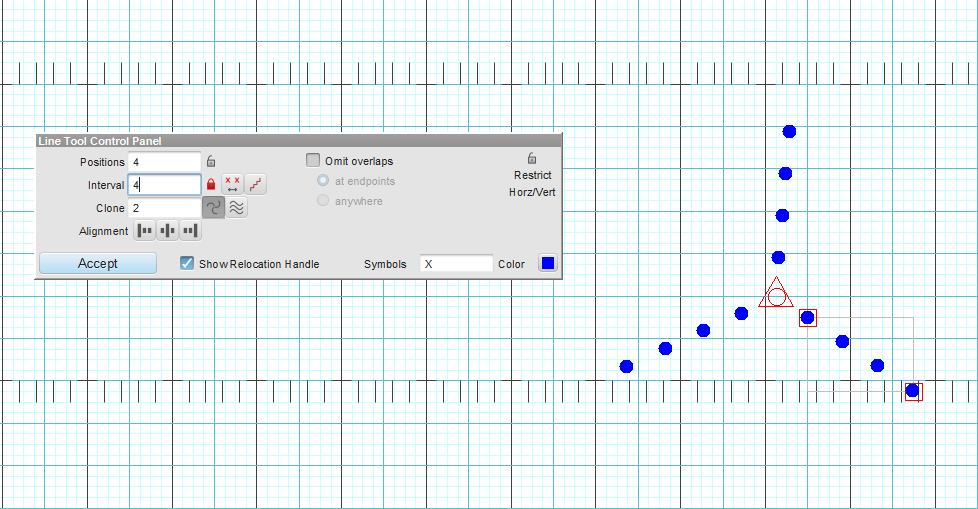
Clicking on the Line tool will display the Line Tool Control Panel.
Drawing a Line
The line is drawn by clicking two points on the field display. The first click will enter the first endpoint and the second click will be the second endpoint.
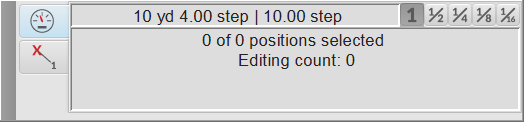
While entering endpoints, the cursor location is displayed in the console. The resolution of the cursor can be controlled by the whole, half, quarter, eighth, and sixteenth step switches in the upper right corner of the Console.
Editing Handles will appear at the endpoints of the line. These handles appear as small red squares and can be dragged to reposition the line by changing the location of the line’s endpoints.
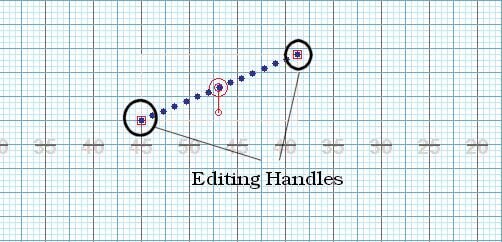
A Reposition Handle also appears at the midpoint of the line. This handle is useful for dragging the entire shape to a different location on the field. Drag the inner circle of the Reposition Handle to move the entire shape. The extended arm from the center of the Reposition Handle is called the Rotator and can be dragged to rotate the line to a new location. The Point of Rotation is the center of the Reposition Handle. To change the Point of Rotation, drag the outer circle of the Reposition Handle to a different place on the field.

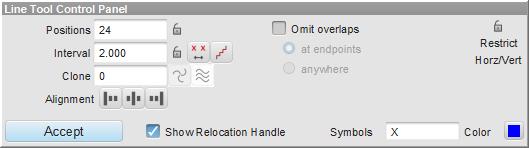
Line Tool Control Panel Options
Entering the number of positions in the Positions box will lock the positions and the line will maintain the number entered while you move its editing handles. Since the number of positions of the line is locked, the line would grow or shrink by changing the interval between the positions.
Similarly, entering the interval in the Interval box will lock the interval and the line will maintain the interval while you move its editing handles. Since the interval between positions is locked, the line would grow or shrink by changing the number of positions in the line.
Mixed Intervals are also entered by pressing the ![]() button. This option will allow you to have different intervals in one form. Mixed Intervals are extremely useful when charting large instruments or instruments that are close together but vary in size (drum lines, for example).
button. This option will allow you to have different intervals in one form. Mixed Intervals are extremely useful when charting large instruments or instruments that are close together but vary in size (drum lines, for example).
To create a Mixed Interval, type the Interval value, followed by an “x”, followed by the number of positions at that interval. For example, a form with 5 positions at a 3 step interval, followed by 10 positions at a 2 step interval, ending with 5 positions at a 3 step interval would be entered like this:
5×3,10×2,5×3
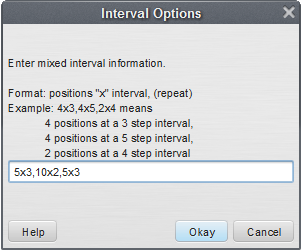
Mixed Intervals can be entered before or after you create your shape, but must be entered before you Accept the form.
Line intervals can also be entered in Rise over Run or slope format. Press the ![]() button to switch the interval text bot to a Rise over Run format. The Rise is the vertical distance between performers, and the Run is the horizontal distance between performers.
button to switch the interval text bot to a Rise over Run format. The Rise is the vertical distance between performers, and the Run is the horizontal distance between performers.
In the example above, a 12 position line would have each performer set 3 steps behind, and 2 steps across from the previous performer.
Positions and Intervals can be locked or unlocked by clicking on the respective padlock. When locked, the value cannot be recalculated by the computer if the size or shape of the form is modified.
Entering a number in the Clone box will create clones of the line. The direction and format of the clones depend on the type of clone selected.The Cloning Handle will be placed in the center of the field and can be moved or rotated to reposition the cloned lines.
Radial Clone
When radial clone is selected, the cloned shapes will reflect radially from the clone handle. This handle can be moved, similar to edit handles, by clicking and dragging around the field.
Linear Clone

When linear clone is selected, the cloned shapes will reflect linearly from the clone handle. This handle can be moved, similar to edit handles, by clicking and dragging around the field.
Forms can align their intervals to the endpoints (edit handles) of a form. To align a form, both positions and interval options must be locked in the tool’s control panel. Forms can align Left, Center, or Right, depending on the alignment button selected.
Omit Overlaps will watch for places where performers of a line are on top of other performers in the drill. The overlapping places in the line will be omitted. Omit Overlaps can watch for either overlaps involving only performers at the line’s endpoints or overlaps involving any performer anywhere in the line.
Restrict Horizontal/Vertical forces the second endpoint to a location on the field that is in the line horizontally, vertically or 45 degrees diagonally with the first endpoint.
When entering the line as NEW performers, Symbol and Color is used to enter the symbol and colors for the new performers entered. Symbol and Color options are only shown for first time performers. To enter a symbol sequence such as X O X O, type the sequence one time. For example, “XO” will enter symbols X O X O X O throughout the line. Clicking on the Color Palette will display color options for the first time performers. The performer’s symbol and color can be changed for existing performers using the Performer Labeling tool.
When creating a line from EXISTING performers, Matching Lines options are used to match the positions of the line to their respective performers in the drill. Matching Lines options are only shown when a shape is entered as the destination of a transition from a previous set. On the field display, matching lines are drawn between the positions in the line and the selected performers of the drill. Often the positions in the line are matched correctly, or simply need to be flipped over to be correct using Flip button. If more matching control is necessary, clicking the Clear button will clear all of the matching lines for you to replace manually. See the Matching Lines for details on matching.
At any time the Animation Controls can be used to preview the line in the drill. Other useful options that can be accessed during entry of the line are located in the upper right corner of the Field Display Window. These functions control the field display appearance such as moving or zooming the field, showing/hiding the text boxes, and showing/hiding the performer labels.
The Accept button will commit the line to the drill page. Clicking on any tool without clicking Accept will cancel the line. The line can also be canceled by moving an anchor on the Count Track, right-clicking anywhere on the field, or pressing [ESC] to close the tool.
Post your comment on this topic.