
The Text tool is used to enter boxes of text directly onto a count of drill. Text boxes are typically used for instructions for the performers, or notes for certain sets.

Clicking on the Text tool will display the Text Tool Control Panel.

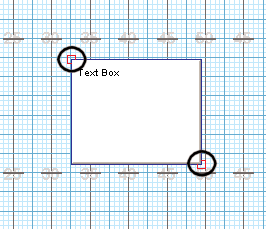
All existing text boxes (if any) will appear on the screen with editing handles in the upper left and lower right corner of each box.
Creating and Editing Text Boxes
Clicking on the field and not on any existing text box will create a NEW text box. The location of the first click will become the upper left corner of the new text box. Move the mouse to a location for the lower right corner of the new text box, then click to generate the box. In order to type inside the box, click in the middle of the text box to place a cursor in the context area for typing.
Clicking and dragging on the editing handle located in the upper left corner of a text box will move the text box. Clicking and dragging on the editing handle in the lower right corner of a text box will resize the text box.
Clicking in the middle of an existing text box will select the text box and place a cursor in the boxes’ content area for typing. A text box is selected if the frame around the box is red. After a text box is selected, changes made in the Text Box Control Panel will only affect the selected text box, leaving all other text boxes (if any) untouched. If no text box is selected, changes in the options of the Text Box Control Panel will have no affect on any existing text box, however, any new text box created will have to be created with the current control panel options.
Contents of a text box can be copied and pasted.
The Bigger and Smaller options under Font Size will increase or decrease the size of the font used within the selected text box.
Framed option will draw a frame around the selected text box.
Transparent will make the text box transparent. When transparent, the field grid along with any performers will show through the text box.
Serif option will change the font to a Serif styled font as opposed to the default setting of a San Serif style.
Delete will delete the selected text box. If no text box is selected, Delete will do nothing.
Current Date/Time will add a timestamp with the current date and time at the time of the button press. This is a helpful feature to aid in keeping track of any revisions that you make on sets. If a date and time is already displayed in a text box, pressing the Current Date/Time button will replace the older date with the current date and time.
Lists of pre-designed text boxes with text can be created and used through the Templates menu located in the Text Tool Control Panel.
Text Box Templates
This feature is available on Interactive and Professional editions only.
When a Text Box is selected, you may choose to quickly import a note from the Production Sheet by choosing one of the five Notes buttons. This will import the note from your current set in the Production Sheet to your text box.
To use a template, select the template from the Templates menu and click Use. Initially there are only a few preset templates in the list.
Adding a template to the list is accomplished by creating a new text box, then selecting “Edit List…* from the Templates list to display the Text Template List Editor.
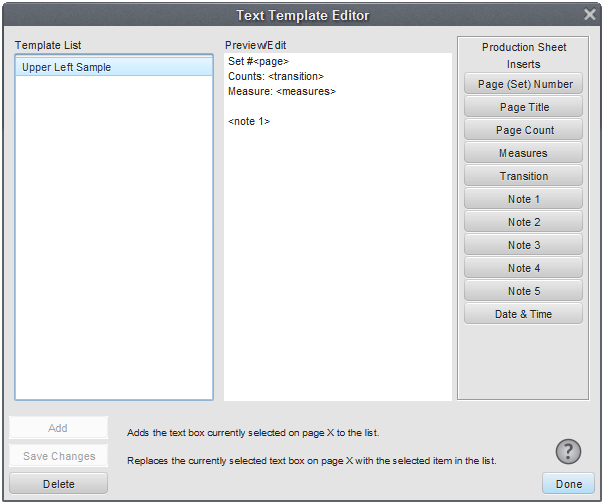
Within the Text Template List Editor, clicking Add will add your new text box to the list. Selecting Replace will replace the selected template in the list with the selected text box on the chart. Similarly, clicking Delete will delete the selected the template from the list.
Selecting any of the Production Sheet Inserts will quickly develop a Text Box Template that you may save and use throughout your design process.
Accept button accepts the text changes into the drill. Clicking on any tool without clicking Accept will cancel the change. The change can also be cancelled by moving an anchor on the Count Track.
Adding and Removing Text Box Templates Across All Drill Pages
Text Box templates can be quickly added or removed from all pages (sets) of a drill. See the FAQ page for steps on how to do this.
Post your comment on this topic.