User Preferences
The User Preferences are found under the Edit Menu in Music Writer Touch. In Preferences, you will be able to customize certain settings of your program, that allow you to make MWT personalized to your liking.
Display
The Display tab has settings for the "look and feel" of Music Writer Touch.
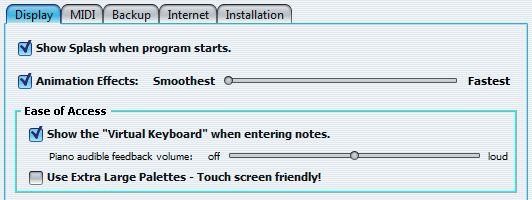
Show Splash
If this box is selected, the Music Writer Touch Splash Screen will appear upon start up. Uncheck to disable this feature. |
Animation Effects
Checking this box will allow for animation effects to be played during notation. Moving the slide bar will adjust the animation to be smoother or faster, according to which direction you maneuver it. Selecting "fastest" or turning the animation effects off could improve performance. |
Virtual Keyboard
Selecting this check box will display the keyboard below your Note Palette. Moving the slide bar adjusts the playback volume of the keyboard when selecting notes. |
Extra Large Palettes
This check box uses the larger set of palette buttons. These are helpful when using Music Writer Touch on a touch screen. |
MIDI
The MIDI tab allows you to select your input and output devices.
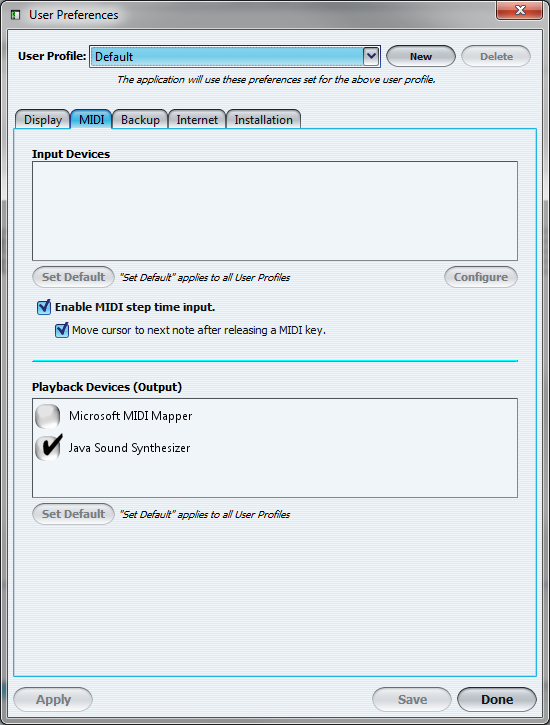
Input Devices
Any device (such as keyboards or synthesizers) with a MIDI input option would be listed in this box. Choose which device you would like to notate with by selecting the corresponding check box. Note:If no MIDI input devices are plugged into your computer, you will not see anything in this box. |
Configure
The configure button allows you to customize your MIDI input device to Music Writer Touch. Selecting the button will open a new window.
For this particular example, the keyboard we have used is not a full 5 octave keyboard. If this situation applies to you as well, you may configure Music Writer Touch to determine the range of your keyboard. To set the lowest note that your MIDI input device can play, select "Set to Next Note Played" across from Lowest MIDI Note (pictured above). Press the lowest key on your MIDI input device, then press "Okay." Do the same for the highest note your MIDI input device can play, except use the "set to Next Note Played" across from Highest MIDI Note. |
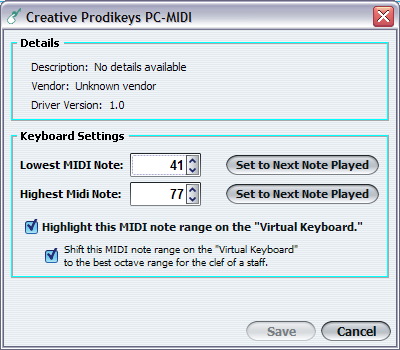
Highlight MIDI Note Range
Once you have configured your MIDI input device, you may check this checkbox to have the "Virtual Keyboard" that is displayed under the Note Palette to highlight the range of keys on your MIDI input device. See the picture below for an example:
|

Best Octave for Clef
Selecting this checkbox will shift the note range on the Virtual Keyboard (displayed under the Note Palette) to the best octave range for the particular clef you are composing in. |
Enable MIDI Step Time Input
This box must be checked if you would like to compose with your MIDI input device. If this box is not checked, you would need to notate using the buttons in the Note Palette. |
Move Cursor To Next Note...
When your MIDI input device is enabled for use, having this box checked will move the cursor to the next available note once a key on your MIDI input device has been pressed. When this check box is unchecked, pressing a key on your MIDI input device will not progress the cursor to the next available note, and must be done manually. |
Playback Devices (output)
Here you will find a list of the current MIDI output devices installed on your machine that may be used for playback. You may select the one that sounds best to your taste. |
Backups
Music Writer Touch has the ability to automatically save backups of your Music Writer Touch files. Here are the options for customizing how those backups are saved.
Backup Folder
The backup folder location is displayed in this section of Preferences. You can choose to delete old backups by checking the delete check box and setting a removal date. Select the "Open Folder" button to open the Backups folder and view the contents. |
Auto Backup
The Auto Backup feature is a great "safety net" function should something happen while using Music Writer Touch. If Auto Backup is enabled, a copy of your file will be automatically saved to the Backup Folder. Here you can adjust how many backups are created per document, as well as the interval of time a backup is created. Note:The Auto Backup feature will only keep the number of backups specified by the "Maximum Backup Per Document" option. This does not mean that it will stop creating backups once you reach the number you have specified. Once you reach the number of backups per file you have selected, the older backups will start getting replaced by the more current backups. |