The Online Users File Access & Passwords utility is to be used by the account’s administrator to setup the access privileges for visitors to their account. Visitors who have signed on to your account are called “users”. Users can access your account from their 3D applications and from downloadable 3D Viewers. There are three types of users:
- Anonymous Guest – This is a user who can access your account without having to sign on with a User Name and Password. These users can only read (download) files from your online account. They do not have the authority to write (upload) files to your online account. Allowing Anonymous Guests to sign on to your account is useful when you want a large group of users to have access to the same list of files, such as all performers in a marching band. Since a User Name and Password are not required to be an Anonymous Guest, it is also useful for Commercial Online Accounts for potential customers to be able to sign on. It is important to note that anyone must be provided with your Account Name and Account ID in order to view the uploaded files as an Anonymous Guest. There is no list or search function where a random individual with no credentials could browse for your files. This is opposite for Commercial Accounts – these accounts are publicly listed in the Online File Manager Account List and can be easily accessed by Anonymous Guests for viewing.
- Registered Guest – This is a user who can access your account with a specific User Name and Password. These users can read (download) files from your online account, but do not have the authority to write (upload) files to your online account. With this utility you can set up Registered Guests to see only selected files in the account. Setting up Registered Guests is useful to give unique file access to a single user such as a customer picking up commissioned drill from a designer.
- Account Administrator – This is a user who can access your account after signing on to the account as a Registered User using the account administrators User Name and Password. This user can read and write files from your online account. All files in the account are visible to this user. The administrator can use this utility to add or edit users and change their access privileges. You can set up different users to have differing access to files in the account. This utility can only be run by the account administrator.
To start the Online File Access & Passwords, select this option from the Interactive menu. The Online Users File Access & Passwords will attempt to go online and find your online account.
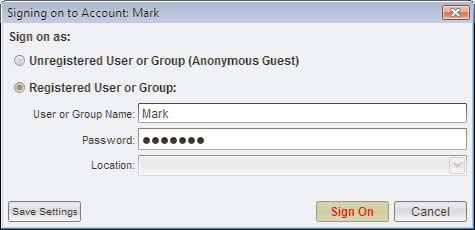
Once connected, a Sign On dialog will display for you to enter the account administrator’s Name and Password.
Clicking Sign On will display the list of all files in the online account.
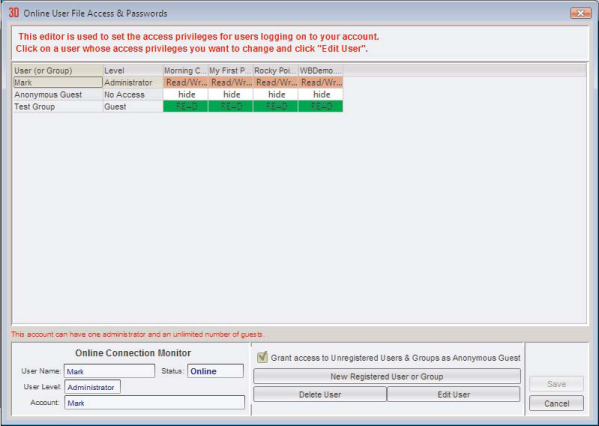
In the table, the User column displays the name you have designated for each of the users or user groups you have established.
The Level column displays the type of level given to each user you have established. The levels are:
- Administrator – has full access to the online account to add, update and remove files.
- Guest – has read only access for downloading files from the online account.
- No Access – can sign on, but will not see any files in the online account.
The remaining columns in the table designate each file in the online account and the type of access privilege the user is given to the file. The privileges are:
- Read/Write – the user can upload, download, and update this file from the online account.
- Read – the user can only download this file from the online account.
- Hide – the user will not see this file in the online account.
The option to allow anonymous guests for public access is used when you want to allow users access to your account without a unique User Name and Password. This option is typically useful for school band programs who want student performers to access certain files on the account without assigning user names and passwords. This option is also useful for Commercial Accounts so that anyone can see a selection of files visible for anonymous guests in their account.
Adding a New User
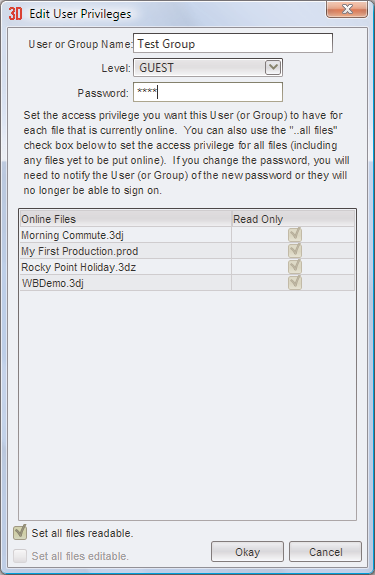
To add a new user or user group to your list of users, click New Registered User. This will display the Edit User Privileges dialog.
User Name and Password are text boxes where you enter a user name and password that you as the account administrator will determine.
Level is the level for the user’s file access. NO ACCESS will prevent all files from being displayed on the user file list. GUEST allows user to see selected files in their users file list to read (download). The only user that can write (upload) files to the list is the Account Administrator.
Online Files is the list of all files current on the Online Account.
When the level is GUEST, the Read Only column determines whether this registered user has access to this file.
Set all files readable is used as a shortcut to set all current and any future files in the online account to Read Only. Remember, this option will set any future files added to the online account to be Read Only for this user. Conversely, if you do not use this option in a user’s privileges, you will need to edit the user’s privileges after new files have been uploaded into the account when you want the user to have access to the new files.
The Read Only column sets the file access for the user. If it is not checked, the user will not see the file when they sign on to the account.
Okay will accept the changes to the new user.
The Edit User button will display the same Edit User privileges dialog as did the New Registered User button.
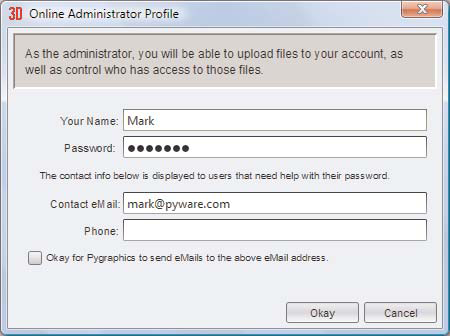
When editing the Account Administrator’s privileges, the log in and contact information will display. This contact information will be displayed to users that appear to be having trouble signing on to your account.
Delete User will delete the selected user.
Save will save the changes made to the account.


Post your comment on this topic.