Howdy folks, as I enter my 3rd year writing drill I am always striving to do so more effectively/efficiently and this year is no different. I have heard/seen people talk about writing drill backwards. What I mean by this is for instance I want to write the first big hit and then work backwards to the opening set, is this possible?
Thanks!
Joel
Norman, OK
Working Backwards
Moderator:PywareTechSupport
Re: Working Backwards
Joel,dorph31 wrote:Howdy folks, as I enter my 3rd year writing drill I am always striving to do so more effectively/efficiently and this year is no different. I have heard/seen people talk about writing drill backwards. What I mean by this is for instance I want to write the first big hit and then work backwards to the opening set, is this possible?
Thanks!
Joel
Norman, OK
I do this all the time with my opening phrases... I know where I want them for the impact and then build the show backwards to the opening set! It is totally do-able, just need to read the directions very carefully and then try it and see... as well as save a version BEFORE you start playing, so you can go back to it when (if) things don't go as planned!
Experiment a bit and then you'll get the hang of it soon enough!
Re: Working Backwards
Hey Joel... what's happenin'? 
As for me, I have been writing backwards and forwards and sideways since as far back as I can remember... which is only in the last 6 years since I started using Java. It seems to be the most creative and flexible way of designing drill that best suits my style.
I don't want to confuse you (or anyone else reading) so stop reading now if you're worried about me possibly rambling on about stuff that'll go way over your head.
hmm...
cool?
okay!
When you're writing backwards from a certain set, let's say that target set is page (tab) 9, you can do this a couple different ways. My way is by setting the page tabs as you normally would... tab 1, 2, 3, etc. I usually set all of my tabs and sync the music file before I begin to write drill. That way, I can play back and preview each set right as I go. I've made too many mistakes and missed too many things in the past. Now, everything works smooth!
So, you start with page 1 and write whatever set you want to be the target set - on page tab 1... yes! I think the manual will tell you that you can Alt/Option+Click on your target set's page tab, but this other way is just how I do it. It's all the same. Then you just click over thru each page tab, until you get to tab 9... there will be anchors between tabs 8 and 9 and a red arrow pointing to the right (forward in time) on the track between the anchors. Just click that arrow and it'll flip to the left, indicating that you're writing the transition from page 8 to 9 backwards. The entire track will turn red also. You can't miss it.
From there you just write the next (previous) set, so on and so forth, all the way back to page 1. Once the page is finished, you just click on the previous page tab to have it slide over and go from there. By having the music already sync'd, it'll be easier to see how it works with the music when you animate it. When you preview the animation, even with it set to write in "backwards" mode, it'll always animate in forward motion, same as it will be performed.
Be careful when writing through holds. It'll be easy to skip them if you don't mark them in your notes as you write backwards (I use notes when I write) or if the pages are already marked with text boxes.
* And don't pay attention to any text boxes you have if you already added those. Not assuming you do the same things I do, but I also add all text boxes with counts/measures info before writing any drill. That's just my thing to help make it easier to associate drill page with music or vice versa. But just in case you do add the texts, know that the info you may indicate on the page will be from one extra page previous to the page you're currently writing to. In other words, if you are writing backwards from page 7 to page 6, the text box you see will be that which you have written for page 6, which is the page 5 to 6 transition.
(yeah, I told you not to read on if you didn't want to get confused! don't blame me... I already warned you.)
Anyway, that made sense in my head.
Now, there are tricky but useful ways to write with this technique in the middle and/or at the end of files also - not just the beginning. But these techniques take a lot of time and patience to figure out... but most importantly, a plan!
One of these techniques is something I learned from studying drill over the years and studying one of my all-time favorite drills written by Michael Gaines - the 2002 Cavaliers "Frameworks" show. It has now become a technique that I use today. Even if it's not what he actually does, I kinda like to think it's very similar since I spent WAY too many hours figuring this out on my own. I used to always watch his drills and wonder "how the heck did he do that?" I still do, but it doesn't take as many viewings these days. lol
So, taking a closer look at the 2002 Cavaliers opener drill. There are 3 main sections - I'll just call them: beginning, middle and ending. The beginning was beautifully written and flowed flawlessly - and I'm pretty sure that Gaines wrote backwards from the first main impact to the beginning. (No, he did not personally tell me he did, but that's just a guess based on my evaluation of the drill. I'm not sure if he actually did or not.) As the movement continues, I think he wrote forwards up until the company front set before switching gears and really breaking things down.
I was not a member of that corps, nor was I on staff nor discussed this with Michael himself... but I always wondered how in the heck he was able to mix the brass the way he did during that "bee hive" section and do all that crazy, flip-flop geometric drill just to end the opener in that S-curve with all of the 64 brass in their respective sections together going contras, baris, mellos and trumpets - all in that order. For some reason, that went way over my head and I'd ask myself "How'd he do that?" Well, I am almost 100% positive it was due to writing backwards and forwards throughout the movement in different places. My personal way of looking at this is to call it writing "sideways."
This is where it gets interesting. What I realized (assumed) is that he wrote much of that middle section backwards - but not from the S-curve at the end, but rather the moment when the brass lock into the big triangle wedge, just before they do that ripple hop/jump over and split the double & single time. (the horn re-entrance after the drum break.) At that point, the brass were split in half (high brass/low brass) and set exactly (per section - not member) where they needed to be after all that crazy cool drill that preceded it. Was that flawlessly planned and executed writing forwards from the company front? It very well may have been but I don't believe so.
What I believe Michael did was he wrote something very cool and worked out how he wanted the movement to end. He wrote the drill from those triangle wedges to the end of the movement, having the brass instruments staged and placed exactly where they needed to be at the start of that "ending" section. Then he went backwards from that wedge set, through the "middle" section, all the way through and DEconstructing the "bee hive" from the block to the company front, placing those instruments in their correct place as they are pulled out of the block through that "scatter" sequence. Obviously, there was a lot of freedom and flexibility in how this was executed due to the scatter and individual paths throughout the sequence.
In a way, he made this all very simple by already having the brass set up perfectly in their instrument order in that company front. All he'd have to do (and this, I'm sure, was well planned out by the design team/visual staff) is pull out however many of whatever section is (in this case, it was baris last to fill the block in forward time, so first to pull out writing backwards) and continue pulling a few out at a time and placing them into their (section's) respective spots in the company front.
This is very complex but I believe with the right amount of commitment and planning, writing backwards (and sideways ) is a technique that can turn out to be very useful when you want to write some extremely complex and off the wall drill moves.
Of course, you kind of have to have some sort of a "transitional" moment in the drill to make this work. The "bee hive" was the transition where the mixed up placing of the brass took place and is what set up the complex moves, in order to get the drill to lock in correctly several pages down the line.
Just as a small disclaimer, I have NO idea how Michael actually wrote this drill sequence or how he writes in general. I've never discussed this with him either so I hope I'm right. I'm actually hoping two things: (1) that at least half of that made sense and (2) that this wasn't some "super secret" that I just unintentionally outed causing Michael to kill me for cracking the code. haha!
I've spent a lot of time studying Cavalier drills dating back to the Brubaker days (early 80's) and have seen some amazing, yet subtle, things within the drill that are probably missed on initial viewings. I do also study other corps' drills and other designers' techniques to try to figure out how things work in their styles... so far I've been lucky enough to figure out how a few things were done and apply those techniques to how I write and how to make it work with Pyware.
This "backwards" technique is one that I use all the time now, and have done similar "sideways" sequences in my shows over the past 4 years. It's VERY difficult, but the payoff is priceless.
----
I'll just post this example to show how I did this with a drill last year.
For the end of this opener, I wanted it to be fairly cool. I had this particular move in mind. Geometrical style... lots of motion... but not too difficult.
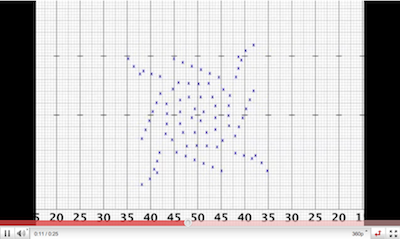
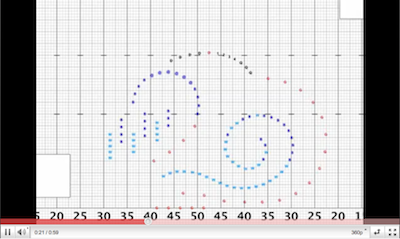
Instead of doing this within the same file, I first experimented with a new file and just played with ideas for the ending until I got what I was looking for. I started where I wanted this sequence to begin and wrote the drill to the end. This is what I came up with, just using the 84 dots as X's, before figuring out who needed to be where.
Video A (click for YouTube video link)
After seeing that you might think, "Geez, that's gonna leave the winds all mixed up like crazy at the end." Well, normally yes, and some designers (myself included) will allow the winds get completely mixed at the end of an opener in exchange for executing a crazy cool drill move... then spend several sets of the next movement pulling them apart and trying to get them back together again, either through scatter drill or staggered moves/halts, etc. (er... just more scatter?)
I did NOT want to do that - ending up with woodwinds and brass mixed up and completely out of order ALL over the field. I wanted to write the exact drill sequence I came up with AND have the winds all be in their sections at the end of the opener - at the very least, brass and woodwinds each together in their large sections. Some would say I wanted to have my cake and eat it too. It just takes a little extra time and preparation.
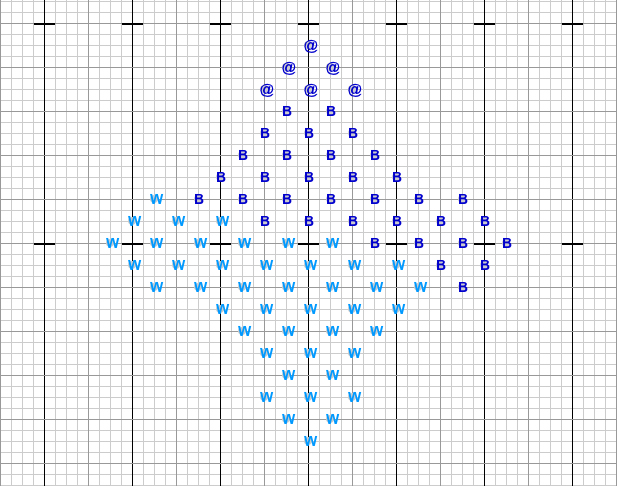
I first decided that I wanted the 6 tubas in the center and in the back of the diamond. Brass would need to occupy the back portion of the form while the woodwinds are naturally in front. I went to the final page of the ending drill that I wrote in the new file and modified the labels according to where I needed the instruments to end up. Initially it was simplified to just tubas (@), brass (B) and woodwinds (W). The original layout I came up with was this:
Photo A
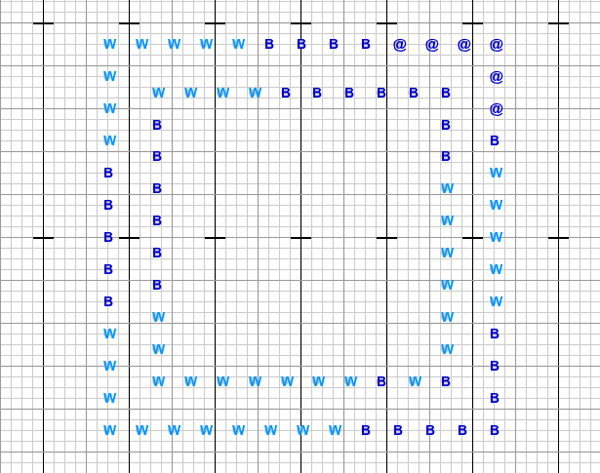
Once those positions were all labeled accordingly, I went back to the beginning of that new file to see where the brass and woodwinds each needed to end up at the start of the "ending" sequence. When I saw this at first I just laughed...
Photo B
Then I started to sweat a little, asking myself "how am I gonna get those woodwinds all the way into that back corner?"
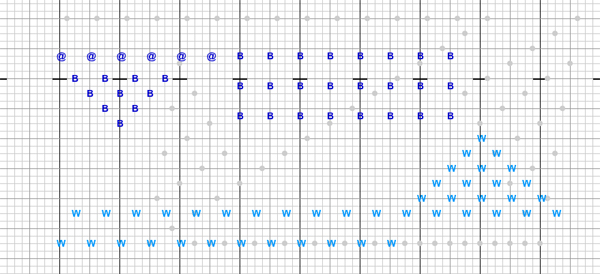
So, then I needed to go back to the original opener drill and figure out how to connect those sections. This is the page (Photo C) where it all began and what I used for reference of where to get all the winds to "end up" after writing backwards from the beginning of the ending sequence.
Photo C
I went into the file... wrote the ending from the page tab that started the ending sequence. Then I wrote backwards to the set shown "Photo C". I had a total of 8 moves and 72 counts. It was NOT easy and there was a ton of pushing and pulling of individuals... probably worked on this for a few days. I can't remember. I used sort of a "scatter"-like sequence to shift people around a bit. Some of the moves may not look the prettiest... and looking back I wish I woulda had more time to make a few of the transitions move a little more fluidly... but it worked! The end result was very fulfilling and everyone (myself especially) was very pleased with it, even though I got stuck having to stick ONE woodwind in the brass on the side B section. It turned out to be fine. Bothered me for days, though.
Video B (click for YouTube video link)
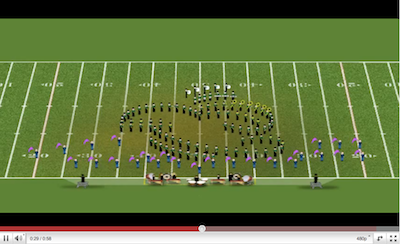
And to see what it looked like in uniform, hiding all of that color contrast that gives away the woodwind and brass mixture:
Video C (click for YouTube video link)
Anyway, I hope all that came out clear and makes sense. I just wanted to demonstrate as best as I could, without actually video documenting the countless hours it takes to actually DO the work, the whole "writing backwards" technique the way I use it and applying it to more than just the start of a show.
Word! Time for me to sleep. Zzzzzz...
George
iMac OS X 10.6.8
Pyware v6.0.6
http://www.georgehesterdesign.com
As for me, I have been writing backwards and forwards and sideways since as far back as I can remember... which is only in the last 6 years since I started using Java.
I don't want to confuse you (or anyone else reading) so stop reading now if you're worried about me possibly rambling on about stuff that'll go way over your head.
hmm...
cool?
okay!
When you're writing backwards from a certain set, let's say that target set is page (tab) 9, you can do this a couple different ways. My way is by setting the page tabs as you normally would... tab 1, 2, 3, etc. I usually set all of my tabs and sync the music file before I begin to write drill. That way, I can play back and preview each set right as I go. I've made too many mistakes and missed too many things in the past. Now, everything works smooth!
So, you start with page 1 and write whatever set you want to be the target set - on page tab 1... yes! I think the manual will tell you that you can Alt/Option+Click on your target set's page tab, but this other way is just how I do it. It's all the same. Then you just click over thru each page tab, until you get to tab 9... there will be anchors between tabs 8 and 9 and a red arrow pointing to the right (forward in time) on the track between the anchors. Just click that arrow and it'll flip to the left, indicating that you're writing the transition from page 8 to 9 backwards. The entire track will turn red also. You can't miss it.
From there you just write the next (previous) set, so on and so forth, all the way back to page 1. Once the page is finished, you just click on the previous page tab to have it slide over and go from there. By having the music already sync'd, it'll be easier to see how it works with the music when you animate it. When you preview the animation, even with it set to write in "backwards" mode, it'll always animate in forward motion, same as it will be performed.
Be careful when writing through holds. It'll be easy to skip them if you don't mark them in your notes as you write backwards (I use notes when I write) or if the pages are already marked with text boxes.
* And don't pay attention to any text boxes you have if you already added those. Not assuming you do the same things I do, but I also add all text boxes with counts/measures info before writing any drill. That's just my thing to help make it easier to associate drill page with music or vice versa. But just in case you do add the texts, know that the info you may indicate on the page will be from one extra page previous to the page you're currently writing to. In other words, if you are writing backwards from page 7 to page 6, the text box you see will be that which you have written for page 6, which is the page 5 to 6 transition.
(yeah, I told you not to read on if you didn't want to get confused! don't blame me... I already warned you.)
Anyway, that made sense in my head.
Now, there are tricky but useful ways to write with this technique in the middle and/or at the end of files also - not just the beginning. But these techniques take a lot of time and patience to figure out... but most importantly, a plan!
One of these techniques is something I learned from studying drill over the years and studying one of my all-time favorite drills written by Michael Gaines - the 2002 Cavaliers "Frameworks" show. It has now become a technique that I use today. Even if it's not what he actually does, I kinda like to think it's very similar since I spent WAY too many hours figuring this out on my own. I used to always watch his drills and wonder "how the heck did he do that?"
So, taking a closer look at the 2002 Cavaliers opener drill. There are 3 main sections - I'll just call them: beginning, middle and ending. The beginning was beautifully written and flowed flawlessly - and I'm pretty sure that Gaines wrote backwards from the first main impact to the beginning. (No, he did not personally tell me he did, but that's just a guess based on my evaluation of the drill. I'm not sure if he actually did or not.) As the movement continues, I think he wrote forwards up until the company front set before switching gears and really breaking things down.
I was not a member of that corps, nor was I on staff nor discussed this with Michael himself... but I always wondered how in the heck he was able to mix the brass the way he did during that "bee hive" section and do all that crazy, flip-flop geometric drill just to end the opener in that S-curve with all of the 64 brass in their respective sections together going contras, baris, mellos and trumpets - all in that order.
This is where it gets interesting. What I realized (assumed) is that he wrote much of that middle section backwards - but not from the S-curve at the end, but rather the moment when the brass lock into the big triangle wedge, just before they do that ripple hop/jump over and split the double & single time. (the horn re-entrance after the drum break.) At that point, the brass were split in half (high brass/low brass) and set exactly (per section - not member) where they needed to be after all that crazy cool drill that preceded it. Was that flawlessly planned and executed writing forwards from the company front? It very well may have been but I don't believe so.
What I believe Michael did was he wrote something very cool and worked out how he wanted the movement to end. He wrote the drill from those triangle wedges to the end of the movement, having the brass instruments staged and placed exactly where they needed to be at the start of that "ending" section. Then he went backwards from that wedge set, through the "middle" section, all the way through and DEconstructing the "bee hive" from the block to the company front, placing those instruments in their correct place as they are pulled out of the block through that "scatter" sequence. Obviously, there was a lot of freedom and flexibility in how this was executed due to the scatter and individual paths throughout the sequence.
In a way, he made this all very simple by already having the brass set up perfectly in their instrument order in that company front. All he'd have to do (and this, I'm sure, was well planned out by the design team/visual staff) is pull out however many of whatever section is (in this case, it was baris last to fill the block in forward time, so first to pull out writing backwards) and continue pulling a few out at a time and placing them into their (section's) respective spots in the company front.
This is very complex but I believe with the right amount of commitment and planning, writing backwards (and sideways
Of course, you kind of have to have some sort of a "transitional" moment in the drill to make this work. The "bee hive" was the transition where the mixed up placing of the brass took place and is what set up the complex moves, in order to get the drill to lock in correctly several pages down the line.
Just as a small disclaimer, I have NO idea how Michael actually wrote this drill sequence or how he writes in general. I've never discussed this with him either so I hope I'm right.
I've spent a lot of time studying Cavalier drills dating back to the Brubaker days (early 80's) and have seen some amazing, yet subtle, things within the drill that are probably missed on initial viewings. I do also study other corps' drills and other designers' techniques to try to figure out how things work in their styles... so far I've been lucky enough to figure out how a few things were done and apply those techniques to how I write and how to make it work with Pyware.
This "backwards" technique is one that I use all the time now, and have done similar "sideways" sequences in my shows over the past 4 years. It's VERY difficult, but the payoff is priceless.
----
I'll just post this example to show how I did this with a drill last year.
For the end of this opener, I wanted it to be fairly cool. I had this particular move in mind. Geometrical style... lots of motion... but not too difficult.
Instead of doing this within the same file, I first experimented with a new file and just played with ideas for the ending until I got what I was looking for. I started where I wanted this sequence to begin and wrote the drill to the end. This is what I came up with, just using the 84 dots as X's, before figuring out who needed to be where.
Video A (click for YouTube video link)
After seeing that you might think, "Geez, that's gonna leave the winds all mixed up like crazy at the end." Well, normally yes, and some designers (myself included) will allow the winds get completely mixed at the end of an opener in exchange for executing a crazy cool drill move... then spend several sets of the next movement pulling them apart and trying to get them back together again, either through scatter drill or staggered moves/halts, etc. (er... just more scatter?)
I did NOT want to do that - ending up with woodwinds and brass mixed up and completely out of order ALL over the field. I wanted to write the exact drill sequence I came up with AND have the winds all be in their sections at the end of the opener - at the very least, brass and woodwinds each together in their large sections. Some would say I wanted to have my cake and eat it too. It just takes a little extra time and preparation.
I first decided that I wanted the 6 tubas in the center and in the back of the diamond. Brass would need to occupy the back portion of the form while the woodwinds are naturally in front. I went to the final page of the ending drill that I wrote in the new file and modified the labels according to where I needed the instruments to end up. Initially it was simplified to just tubas (@), brass (B) and woodwinds (W). The original layout I came up with was this:
Photo A
Once those positions were all labeled accordingly, I went back to the beginning of that new file to see where the brass and woodwinds each needed to end up at the start of the "ending" sequence. When I saw this at first I just laughed...
Photo B
Then I started to sweat a little, asking myself "how am I gonna get those woodwinds all the way into that back corner?"
So, then I needed to go back to the original opener drill and figure out how to connect those sections. This is the page (Photo C) where it all began and what I used for reference of where to get all the winds to "end up" after writing backwards from the beginning of the ending sequence.
Photo C
I went into the file... wrote the ending from the page tab that started the ending sequence. Then I wrote backwards to the set shown "Photo C". I had a total of 8 moves and 72 counts. It was NOT easy and there was a ton of pushing and pulling of individuals... probably worked on this for a few days. I can't remember. I used sort of a "scatter"-like sequence to shift people around a bit. Some of the moves may not look the prettiest... and looking back I wish I woulda had more time to make a few of the transitions move a little more fluidly... but it worked! The end result was very fulfilling and everyone (myself especially) was very pleased with it, even though I got stuck having to stick ONE woodwind in the brass on the side B section. It turned out to be fine. Bothered me for days, though.
Video B (click for YouTube video link)
And to see what it looked like in uniform, hiding all of that color contrast that gives away the woodwind and brass mixture:
Video C (click for YouTube video link)
Anyway, I hope all that came out clear and makes sense. I just wanted to demonstrate as best as I could, without actually video documenting the countless hours it takes to actually DO the work, the whole "writing backwards" technique the way I use it and applying it to more than just the start of a show.
Word! Time for me to sleep. Zzzzzz...
George
iMac OS X 10.6.8
Pyware v6.0.6
http://www.georgehesterdesign.com
Last edited by George on Sat Feb 29, 2020 9:10 pm, edited 5 times in total.
Re: Working Backwards
George. . . you are the man!
Thank you for all that work, after the first read I think I understood about 90%, so give me a day or so and I think I can really grasp this.
Hope life is treating you well, it is funny Lizz got married this last week so I started looking at old Bluecoats pictures, some good memories. Anywho, thanks again for the help!
Joel
Norman, OK
Re: Working Backwards
George, that was really interesting. Not so much for the technical process of using the software (been doing that for years), but because I always find it interesting to hear another drill writer's thoughts while putting together the design. I really like the field layout you have in the final youtube video. How exactly did you get that? Honestly, I almost feel like that should become the new default for PyWare.
Re: Working Backwards
Thanks... still working on it but I have a better one under construction. Production of the new field is on hold until after I've completed the bulk of my drill. Maybe get back at it in the fall.trimpe wrote: I really like the field layout you have in the final youtube video. How exactly did you get that?
I just took the floor cover tool (you need the plugin and ability to add floor covers to do this) and manually created my own custom grass football field. The addition of the pit in that floor cover is just a "beta" test I did a while ago. It's very low resolution and kinda funny looking there. I already fixed the issue with the size and content and added more equipment into the area. The final field I create will also have small orange cones and yardline markers on the front sideline, as well as a light "burned-in" watermark into the grass of my company logo. I only do this for my personal use for presentation of my designs.
edit: this is actually the latest beta version I did a few weeks ago, but it still needs work:
"realistic field" concept
I just uploaded it to show it to a couple people who asked me about it. I still need to tweak a lot of things in it. I need to figure out the exact dpi/resolution going from Photoshop and transferring the image/floor cover to the Pyware perspective window so I can get straighter yard lines and get rid of that "choppy" look. Little things like that bother me for some reason. field numbers are too big... shadow too dark, maybe?... my center logo is a tad big as well. basically everything needs to get fixed. (except the grass - I'm not touching that part.)
I'll get back around to this stuff later.
George
-
cmusaxplayer
- Posts:2
- Joined:Mon Aug 20, 2007 9:07 pm
Re: Working Backwards
George,
As a person who has only been writing drill seriously for about 4 years, I LOVED your description of how to write drill backwards and "sideways," as you put it.
You mentioned that you like to study the drill of designers such as Michael Gaines and others. Is the easiest way to study drill of this complexity to simply watch it over and over again and break only look at a few seconds at a time? There are many DCI shows which I love watching, but I'm not sure how to begin to analyze the drill without looking at the charts in front of me. Any advice you could give me would be great! Thanks!
-Chris Anderson