How To
This is the home page for the "How To" section of the User Guide. Expand an option below to see specific examples on how to perform certain tasks in Music Writer Touch.
Add a Measure
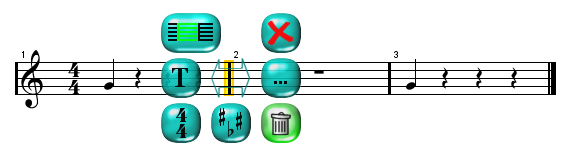
To add a measure, select a bar-line on a staff. This will open the Bar-line Palette. From here, select the "Insert Measure" button. This will add a measure immediately after the bar-line you have selected. Take the following example for a better understanding. Here we have two measures, each with a quarter note on count 1. The measures are appropriately labeled measures 1 & 2, respectively.
Now we would like to add a new measure 2 with a whole rest. Select the bar-line between measures 1 and 2 and then press the "Insert Measure" button.
This will create a new measure 2, and move the previous measure 2 to measure 3. We should now have 3 measures, with measures 1 and 3 having a quarter note on count 1, and the new measure 2 with a whole rest.
|

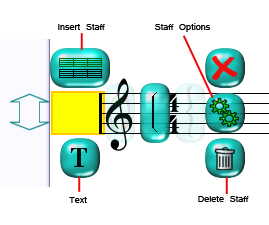
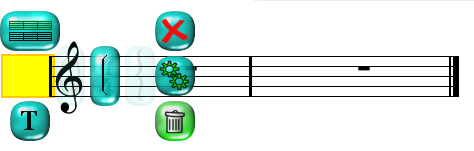
Add a Staff
When you open a new Music Writer file, you default with one empty measure. There are multiple ways you can go about adding a staff, depending on the score order you would like the staff to be added in. To add a staff to a new file, select the bar-line in the opening measure. This will open the Staff Palette, where you may select the "Add Staff" button. Selecting the "Add Staff" button from this location will ask if you would like to insert the staff above or below your currently selected staff. This is so, by default, when the bottom-most (last) staff is selected, you have the option to enter a new staff above or below it.
When multiple staves are present, a new staff will be added above the currently selected staff. The only exception to this rule is if the bottom staff is selected, in which you will be asked if you would like to add the new staff above or below the bottom staff. |
Delete a Measure
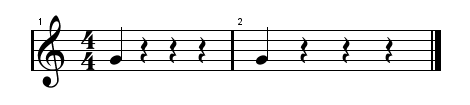
Removing a measure is just as simple of a process as adding one. Select a bar-line on a staff. This will open the Bar-line Palette. From here, select the "Delete Measure" button. This will remove the measure (and all of its notation) from the staff. The following example should be a better visual explanation. Here we have 3 measures. Measures 1 and 3 both have a quarter note on count 1. Measure 2 is empty (it is a measure of rest).
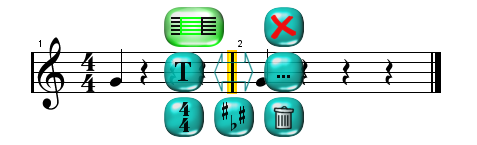
Let's say we want to remove the measure of rest (measure 2) from the staff. Select the bar-line for measure 2 (this would be the bar-line directly under the #2). If your measure numbers aren't displaying you may turn them on from the Document Options button on your toolbar), and the Bar-line Palette will open. From here, press the "Delete Measure" button. This will remove the measure from the staff.
Now we will have 2 measures as opposed to 3, and the old measure 3 has adjusted to become the second of the 2 measures on our staff.
Note:It's important to mention that there is an alternative way to remove notation from a measure without removing the measure itself. It is possible (and sometimes preferred, depending on the situation) to "reset" a measure by changing any notation in the measure to a whole rest. This is done by selecting any note or rest in the measure and then selecting the Whole Rest button from your Note Palette. You may also select the "Delete" button from the Note Palette. This will also default the measure to a measure rest. It's also worth mentioning that any measure's note values can be changed at any point. Simply click on any note in the measure to open the Note Palette. From there, you can change the note value and pitch, and the measure will automatically balance based on the changes you made. |
Delete a Staff
To delete a staff, select the bar-line in the opening measure of the staff you would like to delete. This will open the Staff Palette.
Select the "Delete" button and a prompt will appear, verifying that you would like to perform the delete. |
Reset a Measure
Resetting a measure is a quick way to "re-do" notation in a measure, as opposed to deleting and adding a new measure. You may reset a measure by selecting any note or rest in a measure and pressing the "Delete" button from the Note Palette. A new window will open verifying that you would like to reset all notation in the measure. Selecting "Yes" changes the selected measure to a measure rest, removing any and all notation from the measure. |
Change Score Order
If you ever find that you have written a score and you would to switch stave's positions, you're in luck. You may switch the position of two adjacent staves by the press of a button. Select the two staves by a "click and drag" on their opening bar-line This will open the Staff Palette. From here, you may select the "Swap Staves" button. This flips the order of your currently selected staves. To change them back to their original order, repeat the process.
|
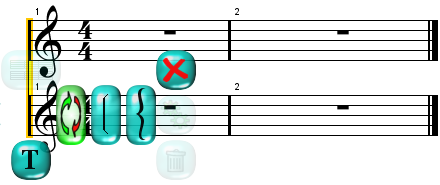
Multiple Voices (Polyphonics)
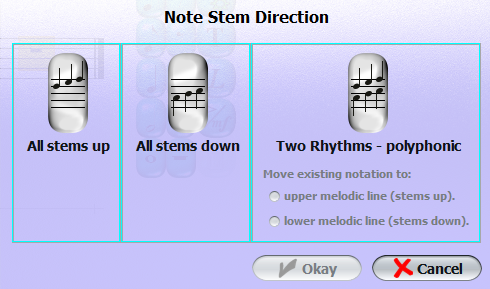
The Polyphonic notation feature is used to write multiple voices on one staff, or to have all note stems point in the same direction (regardless of pitch) for a single voice on a staff. Depending on what you have previously written, there are different ways to go about using this feature. Single Voices (one line on a staff):To have all note stems point in a single direction (regardless of pitch), select the Polyphonic button on your Note Palette. From here you will have two options; "All stems up" or "All stems down."
Choose the direction you would like the stems to point then press "Okay." All stems (on this staff only) will follow the direction you selected. Multiple voices (two lines on a staff):If you are starting a new measure: Select the measure rest: This will open the Note Palette, where you may choose the "Polyphonic" button. A new window will open.
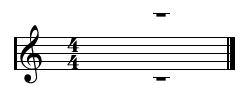
Select the "Two Rhythms - polyphonic" button. This will change the measure rest from one voice to two, with an upper and lower voice (as pictured below).
From here, you may select a rest (either the upper or lower) and begin notation just like you would with a single voice. If you already have notes in a measure:Select one of the notes. This will open the Note Palette, where you may choose the "Polyphonic" button. A new window will open.
Select the "Two Rhythms - polyphonic" button. This will allow multiple voices to be on the same staff. At this point, you will also have the option to move your existing notation to either the upper melodic line or the lower melodic line. Once you select "Okay" the change will apply and you can continue with your writing. |
Add Lyrics
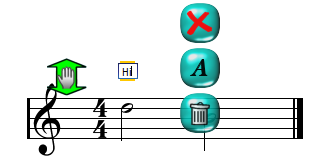
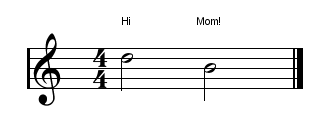
To add lyrics to your notation, you would first need to open the Note Palette. This is achieved by selecting a note or rest on a staff. Once the Note Palette is open, choose the "Add Lyric" button. When you select the "Add Lyric" button, a cursor will appear over your selected note. Type the lyric you would like to add.
From here, you may press the "Enter" key on your keyboard and the cursor will advance to the next note, allowing you to enter lyrics quickly. Note:If there is not another note to progress to, pressing "Enter" after entering a lyric will not advance the tool. To adjust the font style of the lyric, select the font button while the lyric cursor is flashing. To adjust the lyric's distance from the note head, move the Drag Handle. When you are finished entering lyrics, close the palette or select another element.
|