Toolbar
The toolbar in Music Writer Touch is a place to find common features (such as save, open, copy/paste and print) quickly and easily.

Edit Tool
This tool is used to select and edit any notation. To open any palette, you would first need to select the Edit Tool. This tool will be your primary design tool when creating a new file, or editing an existing one. |
Hand Tool
The Hand Tool is used to adjust your view of the notation. Press the Hand Tool button on the toolbar, then click and drag to move your file around to the view that best suits you. To resume notation, you must select the Edit Tool on the toolbar. |
Play (From Beginning)
Play (From Beginning) will play your file from the first measure. |
Play
Plays the music in the document. If a range of notes is selected, pressing Play will play the music in the range that is selected. |
Stop
Stops playback. |
Pause
Pauses playback. To resume playing, select Play. |
MIDI Options
Opens a new window that allows you to customize which staves you would like to hear during playback. The window will contain speakers labeled sequentially for the number of staves you have on your program. For example, if you have 3 non-labeled staves on your composition, 3 speakers would be displayed and labeled 1,2 and 3 respectively. If you have labels on every staff, each speaker would have a corresponding staff label. Selecting a speaker will enable/disable that particular staff to be played. The "All" button will enable/disable all staves from playing. You may select any combination of staves to hear during playback. |
Undo
Selecting this will undo the last change made to the document. |
Redo
Selecting this will redo the last undo (or revert to how the document was previous to selecting undo). |
Copy
Copy transfers the entire measure and all ornaments associated with the measure. This includes articulations, slurs, dynamics, lyrics, ornaments, any text, rehearsal markers, line and page breaks. To copy a measure, make sure that at least one note/rest is selected then choose "Copy." Tip:The copy function does not require a palette to be open. For example, highlighting a note (just mouse over a note) and pressing the shortcut for copy would copy the entire measure. To copy a range of measures, select the measures you would like to incorporate then choose "Copy." |
Cut
Cut removes all notation and associated ornaments from the selected measure(s). This includes articulations, slurs, dynamics, lyrics, ornaments, any text, rehearsal markers, line and page breaks. To cut existing notation, make sure that at least one note/rest is selected and press the "Cut" button. Tip:The Cut function does not require a palette to be open. For example, highlighting a note (just mouse over a note) and pressing the shortcut for Cut would cut the entire measure. To cut a range of measures, select the measures you would like to incorporate and press the Cut button. Once any cut has been performed, any measure(s) will default to a measure rest. |
Paste
Paste applies any copied or cut notation into the selected measure(s). Included with the notation is any articulations, slurs, dynamics, lyrics, ornaments, any text, rehearsal markers, line and page breaks. To paste any copied or cut notation, make sure that at least one note/rest is selected and press the "Paste" button. Tip:The Paste function does not require a palette to be open. For example, highlighting a note (just mouse over a note) and pressing the shortcut for Paste would paste the notation. It is possible to paste over a measure that already contains notes. If you are copying and pasting phrases of music, be sure to exercise caution that you are not going to paste on top of a measure you have already written and would like to keep. |
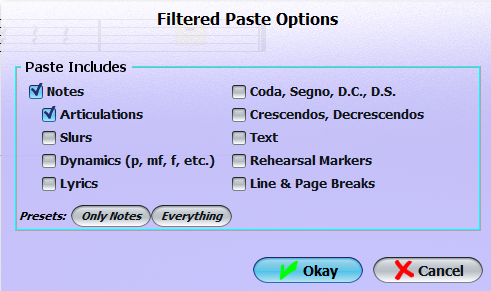
Filtered Paste
Filtered Paste allows you to set restrictions on what is to be pasted from a Copy or Cut. Copy and cut currently retrieves ALL information from the selected measure(s). This includes articulations, slurs, dynamics, lyrics, ornaments, text, rehearsal markers, line and page breaks. If you would like to exclude any or all of the above options when you are pasting your selection, Filtered Paste would be the tool for you. To Filter Paste any copied or cut notation, make sure that at least one note/rest is selected then choose "Filtered Paste." A window will open with various options on what to include or exclude for the paste. Check all options that you would like to include with the pasted notation, and leave any option you would NOT like to have pasted unchecked. Press "Okay" and your notation (with the options you have selected) will appear in your current measure.
Tip:The Filter Paste function does not require a palette to be open. For example, highlighting a rest (just mouse over a rest) and pressing the shortcut for filter paste would paste the notation. It is possible to filter paste over a measure that already contains notes. If you are copying and pasting phrases of music, be sure to exercise caution that you are not going to paste on top of a measure you have already written and would like to keep. |
Save
Saves your file. To save multiple copies of a file or save an existing file under a new name, select "Save As" from your File Menu. |
New
Creates a blank, new file. |
Open
Opens an existing file. |
Allows printing of full scores with the ability to filter and print individual parts. For detailed information regarding printing, please visit the printing page. |
Transpose View
Selecting the Transpose button will switch the notation between written and concert (sounding) pitch. |
Document Options
Opens the Document Setting window, where you may customize various aspects of your file. For more information on Document Settings, please reference the Document Options page. |
Help
Selecting the Help button then clicking on an item in the program will display useful information about that particular object. The information will open a small frame below your notation area, allowing you to read the information while not interfering with your design process. To the right of the frame, there will be a "See Also" box. This contains links to online reference material (much like you are reading here) as well as links to other help boxes that may pertain to your item in question. To close the frame, click the close button. |